Human Resource (HR) Role
|
|
Human resource role
is one of the key roles in DVNASMS. This role will be assign to HR people
only. HR role have permission to access Customer-Interaction-Page,
Employee-Grid-Page, Employee-History-Grid-Page, Interview-Grid-Page,
Login-Creation-Grid-Page and Student-Login-Creation-Page etc.
|
How To Works HR Role in DVNASMS ?
|
|
Step by step guide of HR role works is given below. It is explained about HR role and its responsibilities.
They can make customer interaction of any people to generate customer ID. It will be a unique customer ID. This customer ID will require creating user logins in DVNASMS without customer ID you can’t create application user in DVNASMS.
It will also require taking interview of a candidate who came for interview.
|
Step1 Customer Interaction
|
|
Customer interaction is the first step to work with DVNASMS. In this step you will generate customer ID of any candidate who came for interview before joining the organization.
|
|
Go to your ULR like http://dvnasoftech.in/dvnasms and click on it. Then it will open employee login panel, Authenticate your employee login by putting user name and password. Before start this customer interaction you should confirm about your role in application. Your user login must have HR Role or Administrator role in DVNASMS 2014. Whenever you will login with HR role then it will be open contains page. Click on customer-Interaction page. Select product from products dropdown list. You can select Interview from the product list. Here customer interaction page have required five parameters like First Name, Last Name, Mobile Number, Purpose and Email ID. Click on save button then it will generate unique customer ID. This process is called customer interaction of DVNASMS 2014.
|

Step2 Interview-Grid-page
|
|
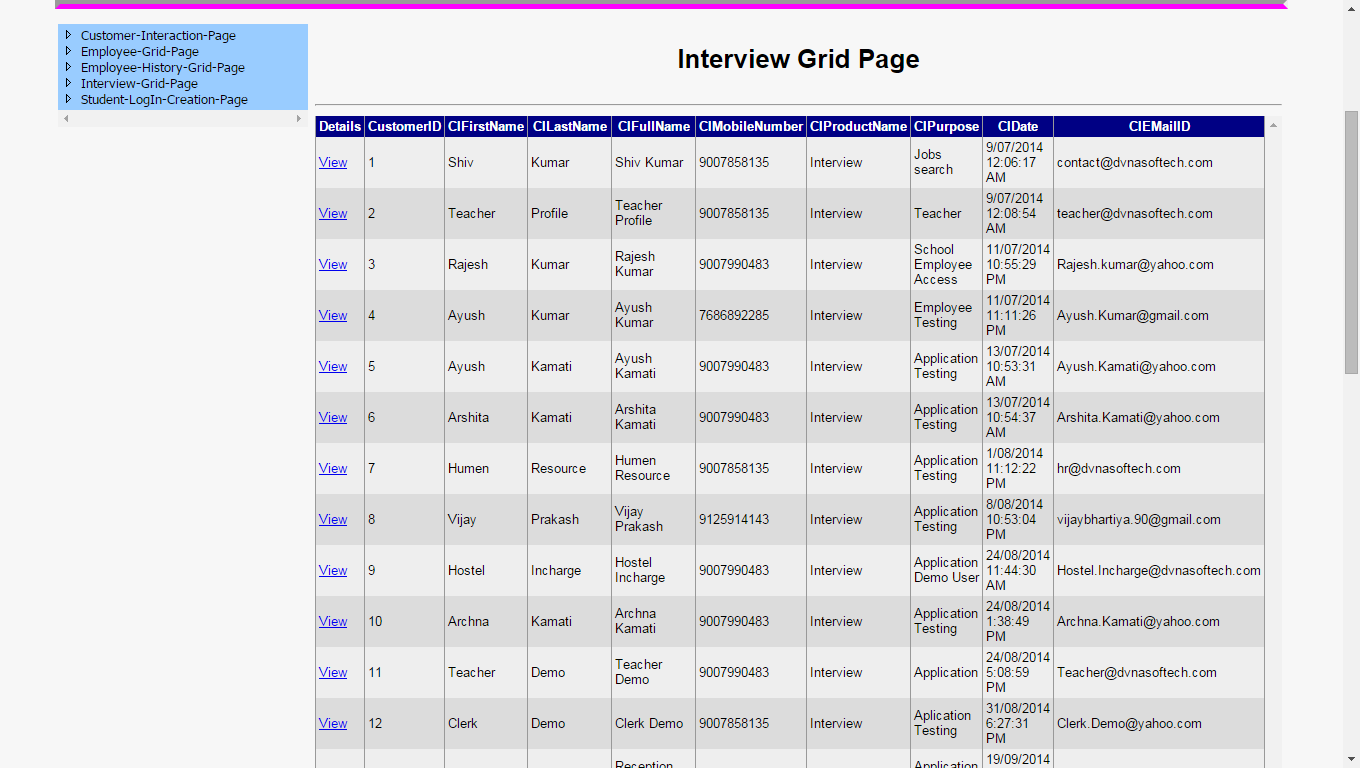
Now click on Interview-Grid-Page. It will show list of customer ID in a tabular
format inside grid view. Go to view option in left Colum whenever you will click
on View then it will open interview page.
|
|
|
Here you have to take interview.
Customer ID will show in customer ID text box and then you have to click on
search button. Now details of customer will show in interview page.
|

|
|
You will see six parameters like technical interview date, T.I. Selected,
Management Interview date, M.I. Selected, Offer letter date and profile upload.
|
|
Here HR people can schedule the interview. Technical interview will be the first
round of interview. If technically selected then select yes and if it is not decided
yet then select pending otherwise select No.
|
|
Again you can schedule second round of interview which is called management
round of interview. In case of management round of interview follow above
same procedure as technical round of interview.
|
|
Now you can generate offer letter by click on edit button and then click on
update button. Here offer letter will be auto generated. There is no any manual invention.
Now interview process is completed and same customer ID will show in Employee grid page.
Customer ID will show in Employee grid page only when offer letter number will generate
in interview grid page otherwise it will not show in employee grid page.
|
Step3 Employee Grid Page
|
|
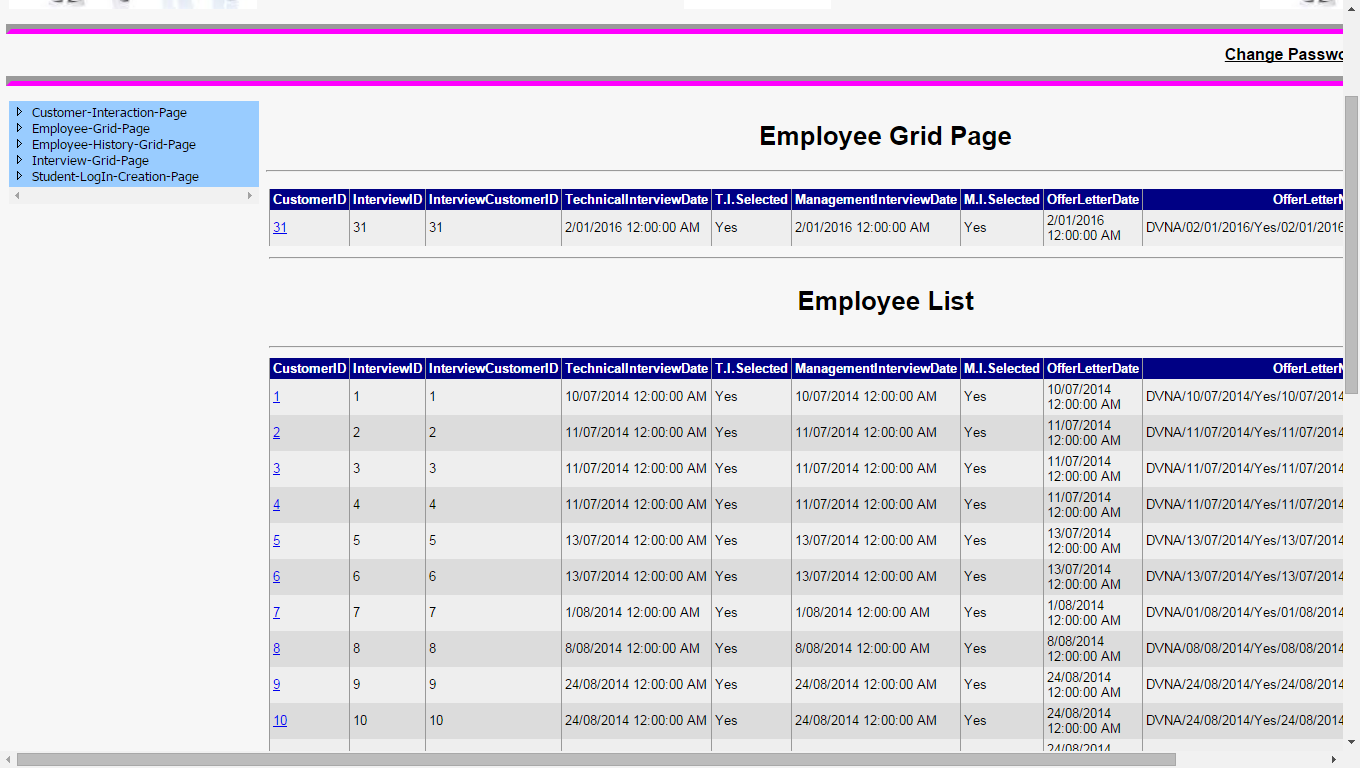
Authenticate your user name and password on employee login panel.
It will open Contains page. Go to Employee Grid-Page and click on it.
It will show Employee Grid Page on above grid and Employee List will show in below grid.
Those customer have already got offer letter will show in employee grid page and those customer
have already joined the organization will show in employee list.
|
|
|
In left Colum customer ID is as hyper
link when you will click on it then it will open Employee Page. Here customer ID will show in customer ID text box.
Now click on search button then it will show entire details of customer. This page will show date of joining
and you have to put date of joining of customer and click on save button then it will generate employee ID of customer
which will be the unique Employee ID.
|

Step4 Employee History Grid Page
|
|
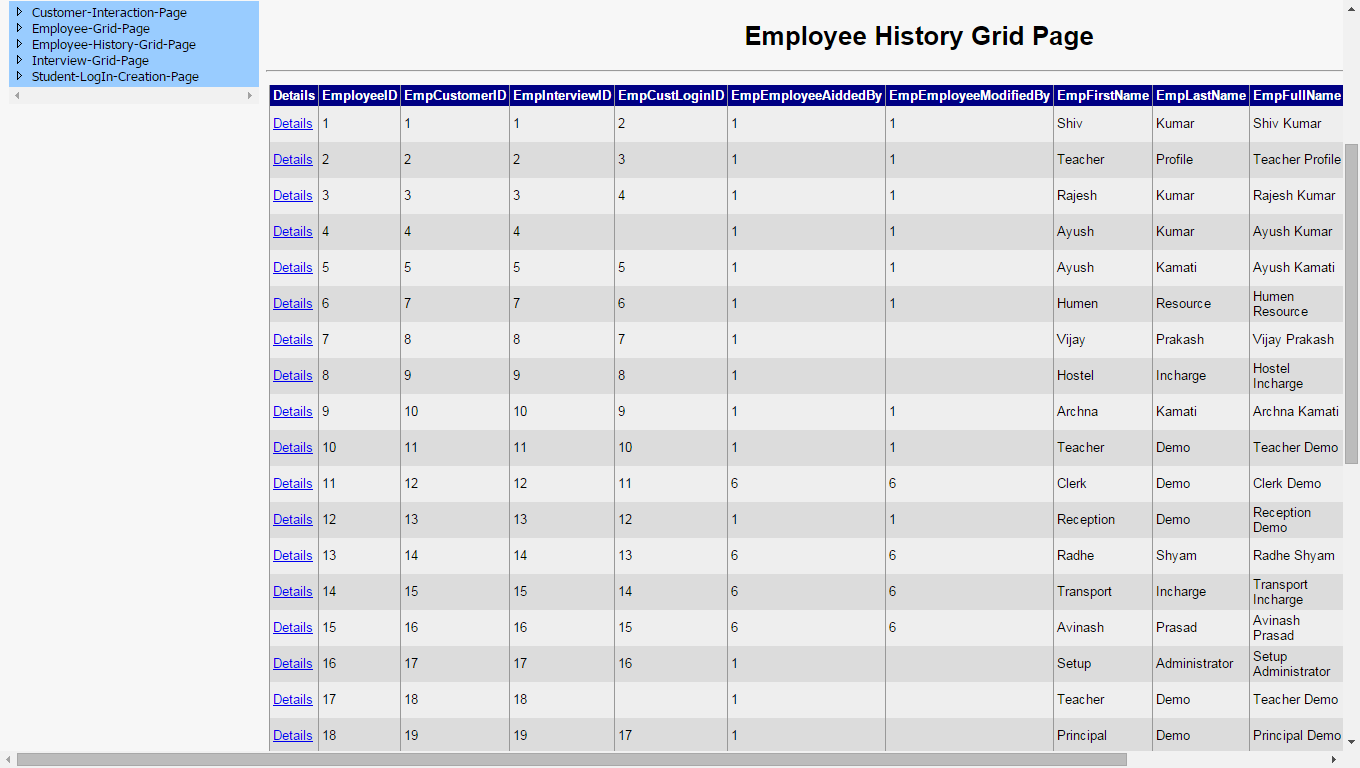
Authenticate your user name and password on employee login panel.
It will open contains page. Go to Employee History Grid-Page and click on it.
It will show details of all employees with employee ID.
|
|
|
Whenever you will click on details then Employee History Page will open and employee ID will show in employee ID text box.
Now you have to click on search button then it will show employee history as desired.
This page is a secured and only HR peoples can see details of a particular Employee.
|

Step5 Student Login Creation Page
|
|
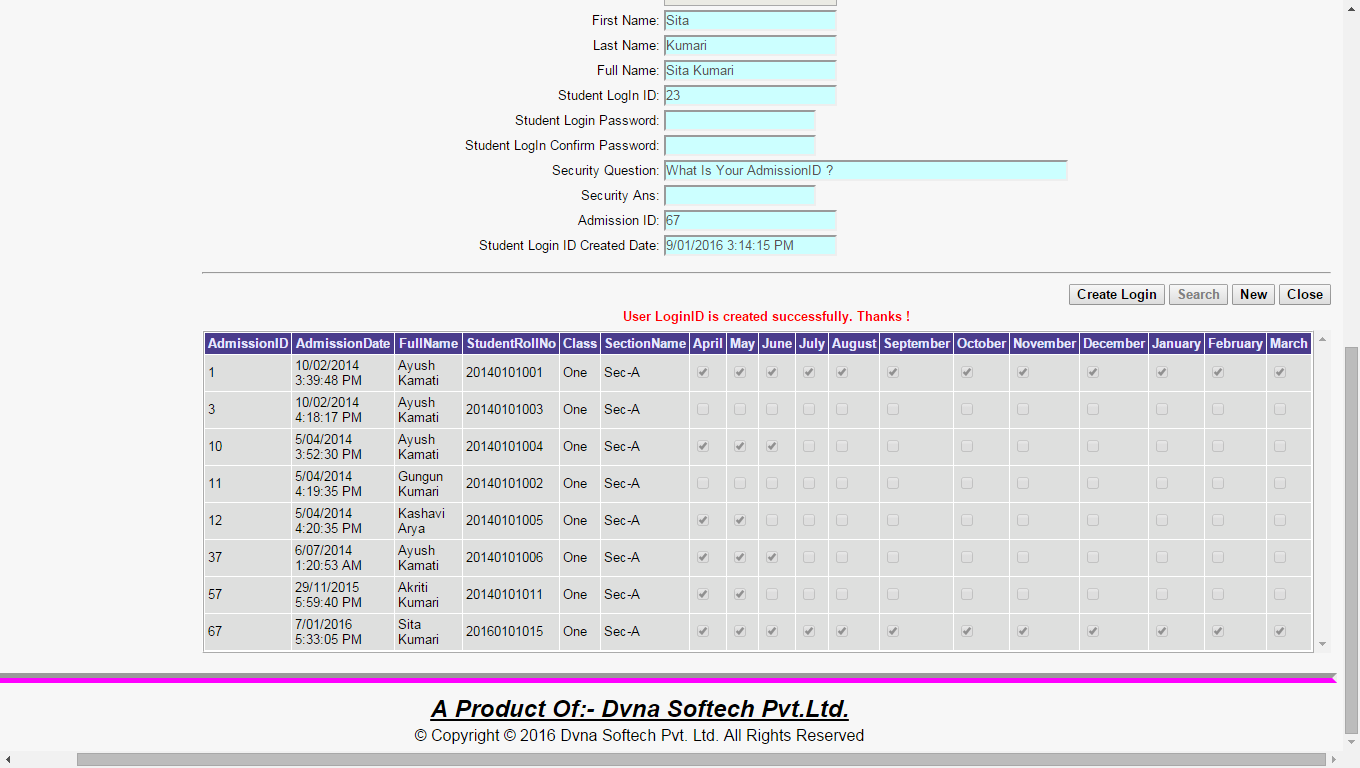
Authenticate your user name and password on employee login panel. It will open contains page. Go to Student-Login-Creation-Page and click on it. You will see dropdown list of class name in left side. Now select the appropriate class name where you have to select the class name after that list of student will be show in below grid view in tabular format. Here you will see the student roll number. Now copy roll no and past it into roll no text box. Now click on search button then it will show his/her all details and login. Here two grid views are on student login creation page. One grid view is on top most and another grid view is in bottom most. Those student needs to create student login id will show in upper grid view. Again those students have already created a student login ID will show in blow grid view.
|

|
|
Step 6 Login Creation Grid Page
|
|
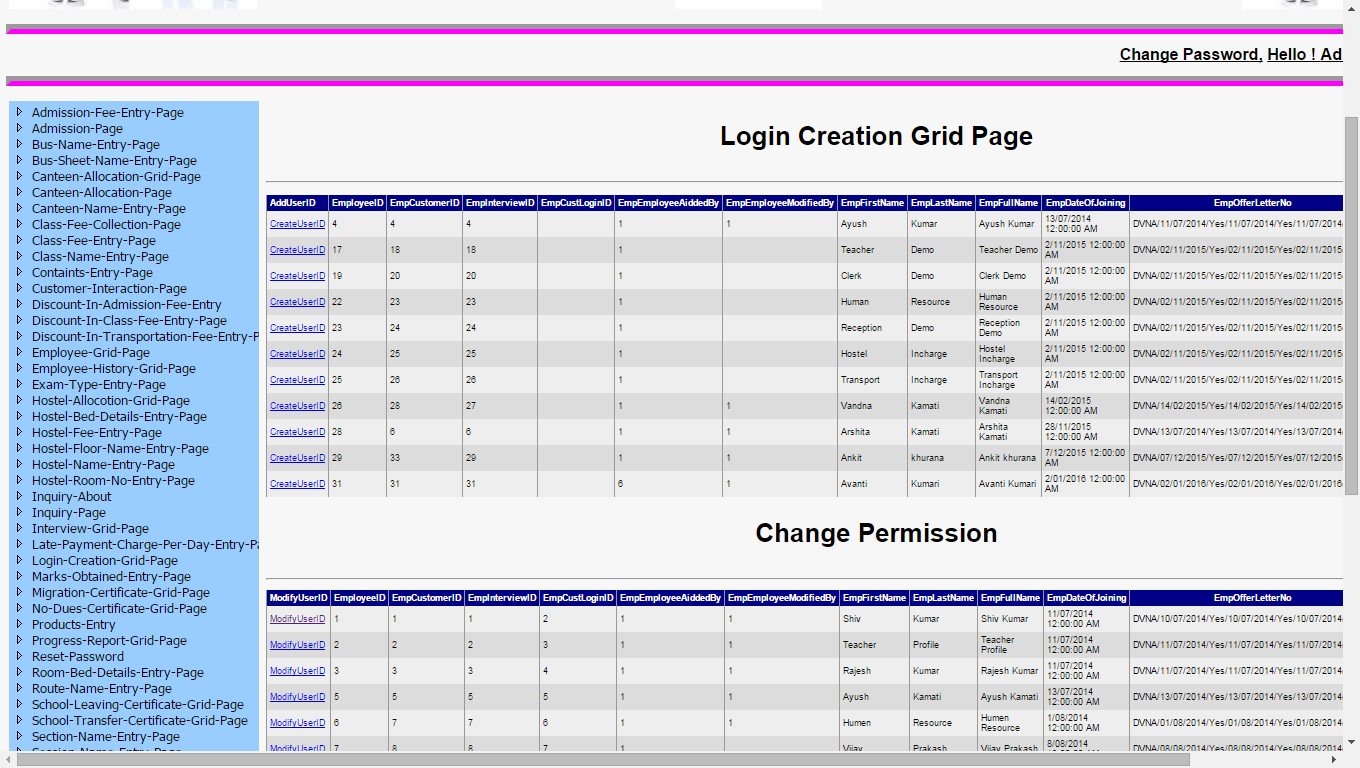
Login creation page is used to generate User Login ID, Create User ID and Password to get authentication in DVNASMS.
You can also change the role of a user with the help of login creation page. Here you will see two grids view,
first login creation grid page and second change permission grid.
|
|
|
Add user Id column name is shown in left side of login creation grid.
It is a hyper link Colum. Whenever you will click on it then login creation page will open.
|
|
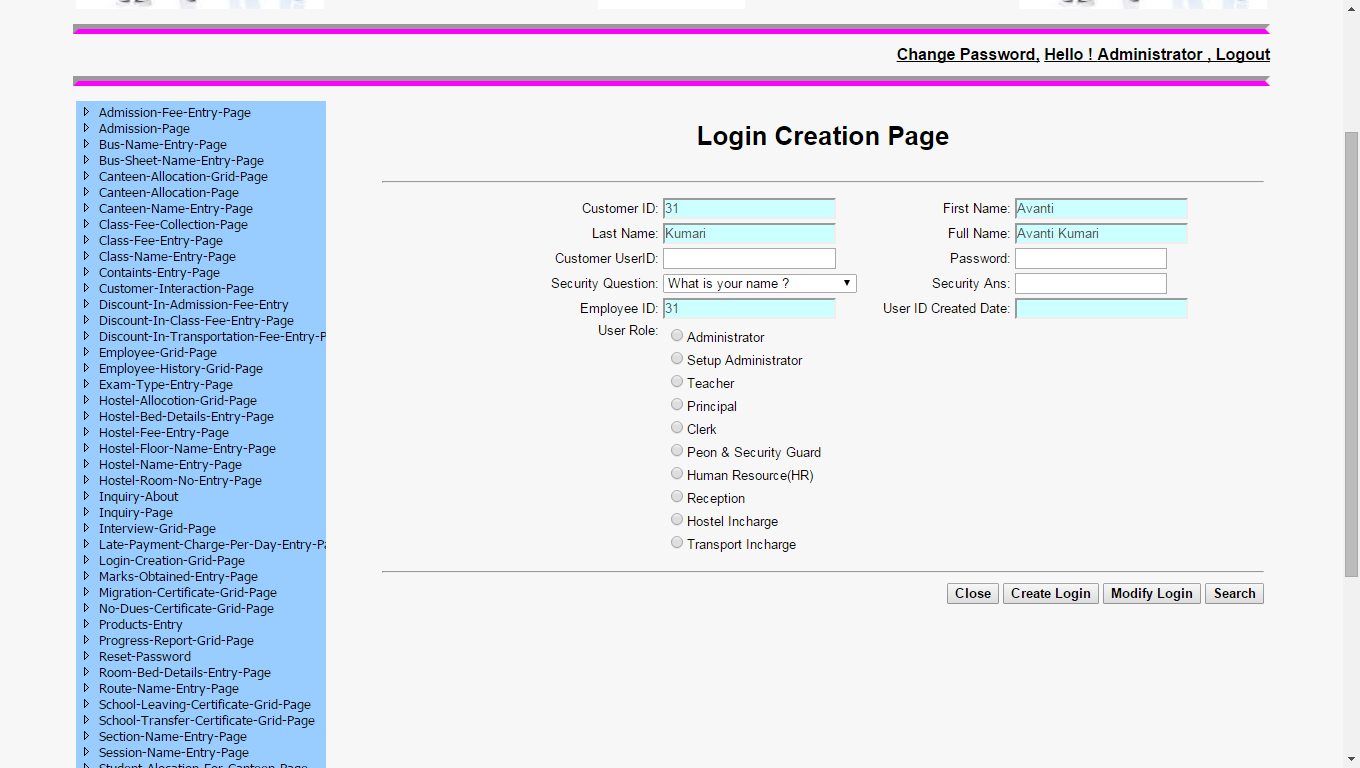
Here you will see text boxes like customer user ID, password,
one dropdown list of security question and security answer. You have
to fill one by one all text boxes, dropdown list and user role. Now click on create login button to create User ID.
|
|
|
You can modify the role of existing user ID according to business need.
You will go to change permission grid and Change permission grid is used for
change employee’s role. Now you will click on hyperlink of a User ID that needs to
be modified then it will open login creation page. It will show administrator,
setup administrator, teacher, principal, clerk, reception, hostel in charge transport in charge etc.
|
|
|
|
|
|
|
|
|
|
|
|
|
|
|